Formatting tricks in MS Word
Posted: October 6, 2013 Filed under: On writing | Tags: agents, formatting, MS Word 2 CommentsI originally posted this over at Aussie Owned and Read in May. I decided my blog needs a few more yawns and a little less excitement (lol), so here it is again for those that missed it.
I can’t decide if this is going to be the most boring blog post in the history of the world, or extremely useful. It may actually be both—I shouldn’t limit myself to a single option, I suppose!
I’m here to talk to you about Microsoft Word formatting tricks to save time when you’re reformatting your manuscripts to meet different agents’ or publishers’ requirements (or so they look correct in blogs; I just had to fix this one using one of these tricks). These tips have all been written for Microsoft 2010, but they work in 1997–2003 as well; they just won’t appear quite the same way on the screen.
Anyway, say you’ve got your beautiful manuscript, and you’ve written it in a standard paragraph format, with an indent at the front of each paragraph. An agent asks you to submit it with no indent and an extra carriage return between paragraphs, like this post. You don’t have to do it all by hand: there are a couple of quick tricks you can use to reformat the entire document in seconds.
The first step is to get rid of the indents at the front of the paragraphs.
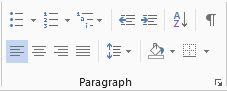
How to access the paragraph formatting box: click the little arrow in the bottom right corner
If you’ve used the hanging indent option it’s easy enough: just select all your text, go into the Paragraph box, and set the indentations to 0pt and none. (If you don’t know, the paragraph box is on the Home ribbon; you access it by pressing the little arrow in the bottom right corner of the box.)
But if you’ve used the spacebar to indent, you need to use the Find and Replace tool. (Press CTRL+F and then click on the down arrow at the far right of the search box and choose Replace.) In the find cell, put the number of spaces you used (say three). Leave the replace cell empty and hit Replace All. That should remove all your indents—although you’ll want to run your eye over it to make sure you haven’t used a different number of spaces anywhere. (This is also the way I reduce two spaces after a sentence down to one.)
Then you need to add that extra carriage return.
This is the sneaky bit. Go back into Find and Replace. In the find cell, write ^p. In the replace cell, write ^p^p. The caret (that’s what the little upside-down v is called) tells Word to look for the paragraph character. Then hit Replace All again.
Ta da! (Okay, I know I’m the only one excited about this, but can you at least pretend to be excited?)
Obviously you can also use this tip to go the other way as well, reducing two carriage returns to one and then adding indents.
Other Find and Replace functions
Other awesome functions of the Find and Replace tool include finding other special characters, and finding specific (or all) text in a certain format. All of these options are accessible from the Find and Replace tool if you click on the button that says More>>. The extra pane that opens up has two more buttons (Format and Special, funnily enough), which open up a world of new options.
-

Searching for an italicised word and replacing it with an unformatted version
For example, in my first manuscript I’d used a few foreign words (okay, words I made up) and italicised them throughout the entire document. But because they were used quite often, I later decided the italics were annoying. I didn’t want to search for every occurrence of the word and fix it by hand. And I also didn’t want to unitalicise the entire document—because I’d used italics for other things, like thoughts.
So I did a find and replace for each of the words formatted with italics, and replaced them with the same word with the font set to “Regular”. What could have been an hour’s work was done in minutes. (You can also search for all examples of italicised/underlined/whatevered text by leaving the find box empty but specifying the format.)
Another example would be if you’ve used tabs to indent your paragraphs rather than spaces or indents, and you want to change it to (say) spaces. If you look in the Special dropdown list, you can see that the tab character is ^t. So if you find ^t and replace with three spaces, Word will take care of it for you.
Format Painter
-

Format Painter: my favourite and my best
The last tool I want to mention is a little gem called Format Painter. You may not use it much in drafting a novel, but it is pure gold for a document with different styles, such as a non-fiction manuscript, essay or newsletter. Format Painter lives on the Home ribbon.
Put your cursor in a block of text with the correct formatting, and then click that button. Then click on the paragraph you want to apply the correct formatting to. Voila! All of the formatting should be applied to the new paragraph. (I say “should” because sometimes it’s a little flaky. But it usually works a treat!)
So, those are my favourite Microsoft Word formatting tips. I hope they help you as much as they help me. Do you have a favourite formatting trick? I’d love to hear about it.
Hey! Are you still awake? *pokes*